Working with Picklists
Use Picklists to create lists of parts
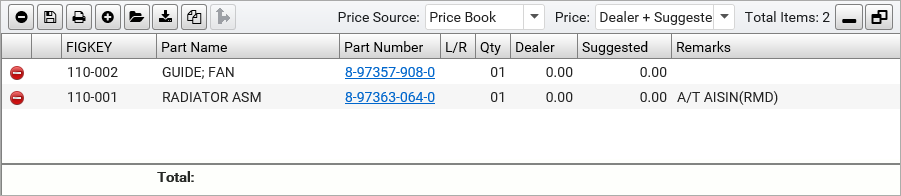
Viewing the Picklist
The picklist pane appears at the bottom of the screen. The picklist pane is normally hidden when you first open EQ-Hit. Click the Display Picklist icon ![]() at the bottom right of the screen to see the picklist.
at the bottom right of the screen to see the picklist.
Adding a Part to the Picklist
Click the Add to Picklist button ![]() next to a part in the parts list to add the part to the picklist.
next to a part in the parts list to add the part to the picklist.
Tip: When FIGKEYs map directly to a single part number, you can double-click a FIGKEY in the illustration to add it to the picklist.
Deleting a Part from the Picklist
Click the Delete button ![]() next to a part in the picklist to remove the part from the picklist.
next to a part in the picklist to remove the part from the picklist.
Picklist Tools
Picklist management tools are located along the top of the Picklist toolbar.
| Tool | Function |
|---|---|
|
|
Clear all parts from the picklist. |
|
|
Save the picklist. |
|
|
Print the picklist. |
|
|
Add a part manually to the picklist. You must manually enter the part number, quantity, and description. |
|
|
Open a saved picklist. Note: The saved picklist will replace the contents of the current picklist pane when it opens. If you don't want to lose the current one, save it, or open a new job tab in which to open the saved picklist. |
|
|
Export your picklist as a .csv file compatible with other software. Clicking this button opens the Columns to Export window, where you can check or uncheck boxes to add them to or remove them from the exported file. By default, EQ-Hit will export the FIGKEY, Part Number, Part Name, L/R, PRICE, and QTY columns. |
|
|
Create an estimate from the parts in the picklist. |
|
|
Appears active when there is a Best Value Part for one of the items in the picklist. Click to add the Best Value part to the picklist. |
|
|
The part in the picklist has supersession or a Best Value Part available. Click to view these items in the part details display. |

|
Select a source for prices displayed in the picklist. You can select a Price Book, if your distributor has made one available, in the Product Settings. |

|
Show or hide various picklist prices. |

|
Send parts to your DMS. This button appears only if you have configured integration.
To submit the current picklist to your DMS, click the button or press the F2 key. If more than one integration type is configured, click the list box arrow and select the integration type you want. |
|
|
Display the picklist. |
|
|
Display the picklist in full-screen mode. |
|
|
Hide the picklist. |
| Right-click Options |
Right-click your mouse anywhere in a picklist entry for more options:
|
Saving a Picklist
Save a picklist so that you can return to a job later or maintain lists of parts used for common repairs.
- Click the Save button to open the Save Picklist window.
- The VIN or catalog number will appear as the default picklist name, but you can change this by typing over it.
- Click Save.
You can reopen a saved picklist at any time by clicking the Open button.
Managing Picklists
- At the top of the screen, click Manage → Manage Picklist to open the Manage Picklists window.
- Highlight a picklist.
- To open a saved picklist, click the Open button.
- To rename a saved picklist, click the Rename button. Type the new name and click the Rename button.
- To delete a picklist, click the Delete button
 next to the list you want to delete.
Click the Yes button to delete the list.
next to the list you want to delete.
Click the Yes button to delete the list.
- Click the Close button
 at the top right of the window.
Displaying Picklist Prices
Select an option from the picklist's Price menu to determine which price types will appear on the picklist.
Important: The price displayed for a part is the total price for the quantity selected. For example, if a part in the picklist shows "3" in the quantity column and "150.00" in a price column, the price for one part is 50.00.