Working with the Parts List
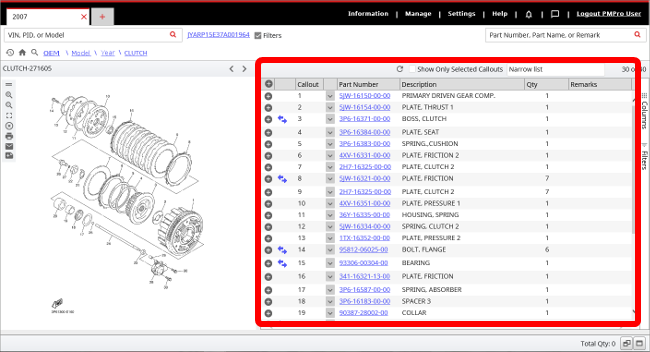
The Parts List gives you detailed information about each part in an Illustration. To see a Parts List:
- From Navigation: After selecting a product, you can choose an illustration from the Product Page.
- From Search Results: Click a part name or illustration title from the list to go to its corresponding side-by-side display.
The Parts List will appear on the right half of the Side-by-Side Display:

The specific information displayed in the Parts List depends on the selected catalog.
Understanding the Parts List
| Element | Function |
|---|---|
|
|
Resets the parts list by removing column formatting and filters and displaying all parts. |
| Show Only Selected Callouts | Check this box to limit the Parts List to only parts that have been selected in the illustration. Uncheck it to display all parts regardless of what is selected in the illustration. |
| Narrow List | Type text in this field to filter the parts list so that only parts containing that text are displayed. |
|
|
This banner heading appears above the Parts List when one or more notes are linked to the illustration. Click the heading to view the notes. |
|
|
Adds a part to the picklist. After the part is added to the picklist, the icon changes to a green check mark |
|
|
The part has a Note. Click to see the Note in the Part Details window. |
|
|
There is Supersession data for this part. Click to see supersession history in the Part Details window. |
|
|
There is a link. |
|
|
There is additional part information available. |
| Callout | The first data column displays callout numbers that match the corresponding parts in the illustration. Click this number to highlight the related part(s) in the illustration. |
|
|
Click (or tap, on a tablet) to display Copy Part Number or Where Used options for the part. |
| Part Number | Click the underlined Part Number to open the Part Details window. |
| Right-click Options |
Right-click your mouse anywhere in a part entry for more options:
Tip: Right-click options vary depending on where you click on a part entry. If you do not see the option you want, try clicking on a different section of the part entry. |
|
|
Click this tab on the right of the parts list to select which columns of information to display. Columns with a checkmark will appear in the parts list. |
|
|
Click this tab on the right of the parts list to apply advanced filtering to the contents of the parts list. |